WormMainea
  • Home
  • Basics
  • FAQs
  • Your Bin
  • Store
  • Blog
  • Blog Archive
  • Vermicompost Tea
  • Speaking & Events
  • Feedback
  • About
  • Contact
  • Links & More Info

What's in your worm bin?

11/7/2016

0 Comments

 
From the blog archive; originally published on November 9, 2009
You may think you have mostly worms in your bin, but you’d be wrong. In fact, your bin is a very complex and diverse ecosystem. You have hundreds of species of organisms working in harmony to turn your food waste into beautiful compost. Your red worms are only a very small population of the other micro- and macro- organisms that inhabit your bin.

Sometimes new users write me with concerns when they notice some populations that bloom in number. Often they fear these organisms will flee the bin and harm houseplants or become a pest in their home. No need to worry. These organisms are happy in your bin where they have food and darkness. They are decomposers, so they do not harm houseplants.

What is really interesting is that these species have slightly different environmental preferences and food requirements. This means that depending on the conditions in your bin and what you are feeding, you may have some population blooms of these other species. For example, if you place a lot of sugary fruit in your bin, you will see mites bloom followed by an increase in the number of springtails. When their food supply weans they will die off.

Bacteria
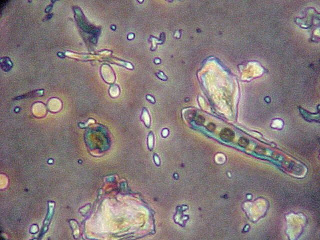
Bacteria are by far the most numerous organisms in the vermicompost system. They break down organic matter to make it available to earthworms and other organisms in the bin. Remember, your worms don’t eat the food you put in, but the rot that is on the food. Bacteria are essential to your worm bin, just as they are in outdoor soil.

Mold & Fungi
In addition to the bacteria, mold and fungi are busy decomposing the organic matter in your worm bin. They are also an additional food source to other organisms in the system, including earthworms. Because they can grow big enough to be seen, these can be a sign that you have more food than the system can quickly manage and the feeding rate should be decreased. Mold and fungi pose no threat to the garden or the animals living in the worm bin, but overgrowth of these can cause irritation to humans with mold allergies. To keep them under control, feed in small amounts and when you see an overgrowth of these hold back on feeding.

Mites
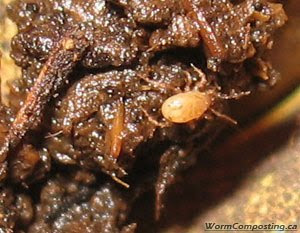
Mites (reddish brown specks about as large as a typed period) are commonly found on the surface of the bin (if your bin is light colored, you can often see them on the sides near the soil). Mite populations will bloom when you have wet, sugary foods (fruit) in your bin.

Springtails
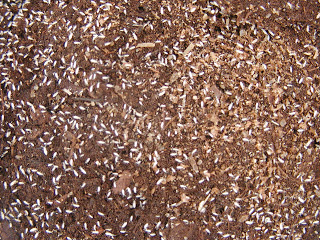
Springtail are an insect (white or tan) that can be seen fairly easily on the surface of the soil. They are beneficial in the system and have no interest in living plant tissue. Some texts claim that more than 80% of the organic matter on earth passes through the gut of a springtail or sow bug on its journey to becoming topsoil. They are most noticeable after a bloom in the mite population or in nearly finished compost.
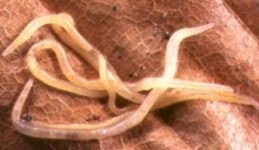
Potworms
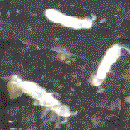
Sometimes mistaken for young red worms, these are very small white worms. They too are beneficial organisms that feed on decaying organic matter. Potworms are more common when your worm bin is on the acidic side, but they do not necessarily mean that you have a problem. You will see them after adding a lot of citrus.

Tips for keeping your bin running smoothly
Remember: the food waste you add to you worm bin today isn’t eaten by the worms until the other actors in your bin have done their job. Bury your food (adding the amount appropriate to the number of worms in your bin) to bring these organisms in contact with your food to get the process started and next time you have a moment, take a close look at your ecosystem. You may be surprised at the complexity of the system you are maintaining.

As always, your senses should be your guide to vermicomposting. What do you see, smell and feel in your bin?

Cheers,
Mark

Originally published on November 9, 2009
0 Comments

Are you wondering what to buy for Christmas?

11/7/2016

0 Comments

 
From the blog archive; originally published on November 25, 2009
A worm bin and pound of worms make a great Christmas gift.

I am not alone in this idea। I had someone come by my booth at Common Ground who told me that a worm bin and pound of worms the hot item at Yankee swap. Also, several people purchased worms and a bin from me this year as gifts for mom.

Worm bins need not be expensive or complicated. I think a simple bin is really a lot easier to use (and certainly easier to build!).

In my mind, the perfect gift would be a book on vermicomposting (like Mary Appelhof's book, Worms Eat My Garbage: How to Set Up and Maintain a Worm Composting System), a pound of worms and a new bin.

If you are already vermicomposting, you can provide the worms and make the bin. If you're an experienced vermicomposter, you can provide a vermi-consultation and skip the book. The more people we have vermicomposting the better.

If you are looking for other gift ideas, I recently created Amazon lists of my recommended vermicomposting supplies, as well as favorite garden tools and books.

You can view at:
  • WormMainea vermicomposting tools and supplies
  • WormMainea gardening tools and book recommendations

Happy Holidays!
Mark

Originally published on November 25, 2009
0 Comments

What is the best size for my worm bin?

10/11/2016

0 Comments

 
From the blog archive; originally published on October 6, 2009
Really that is determined by what works for you in the space you have.

You can buy manufactured bins online or in progressive stores, but I suggest you save your money and make one yourself!

When I respond to this question, I offer the following suggestions and considerations:

Red wigglers don’t typically dig more than 8” deep into a worm bin, so a really deep bin does not work as well as a shallower bin. You want to have the worms all the way at the bottom of the bin to keep conditions aerobic.

Really large bins (30 or 50 gallon size) can be used for worm bins, but they are VERY heavy when full of worms and vermicompost. If you’re planning to move your bin (e.g., take it outside to harvest using the sun), consider a series of smaller bins. If you're not going to move it, these large bins can certainly work.

Small bins can also work. Some people have shoebox size bins they keep under the kitchen sink. This can work, however, you must closely monitor conditions in your bin and be careful what you feed them. In a small bin the worms have nowhere to escape if the conditions become unhealthy. A friend had a wonderful bin until a bunch of limes were added in a layer to the bin after a Cinco de Mayo party. Soil pH dropped and all the worms died. This is also why I recommend you feed in the corners when you are starting.

I find the standard 18-gallon plastic storage totes work well for me. They are reasonably sized to allow the worms to flee from any bad things you may add, they are not too when full, they don’t take up too much space in the room, and they can be stacked. Click here for instructions to build your own bin.

The size and style of your worm bin is not important. If it works for you then it is best. The most important thing is that you get started with a worm bin.

Cheers,
Mark

Originally published on October 6, 2009
0 Comments

QUESTION: What do I do with worm castings in March?!

9/9/2016

0 Comments

 
I realize that some of you who purchased in the fall processed last weekend when temps in Maine were spring-like. My garden is still under about 2 feet of snow. Many contacted me to ask: what do I do with 15+ gallons of worm castings in March?

Worm castings can be stored in a container like a worm bin. Keep them moist and let the castings breathe (remember that the castings are alive!). You don't want to let the casting dry out if you're going to make great tea (active organisms plus nutrients). Most recipes for tea call for about a pound of castings in 5 gallons of water (dilute to 10 gallons to use).

Castings stored this way will keep for several months-- just in time for real spring! In the interim, use what you have to make tea for your houseplants or soil amendments for seed starters. Just remember that your vermicompost may be full of viable seeds!

Tip of the hat to Bruce Deuley for his valuable contributions to the procedure. You can get the brewed vermicompost tea directions here.

Cheers,
Mark

Originally published on March 14, 2009
0 Comments

Sourcing food for my herd and dreams of a composter for every home, restaurant, and grocery

8/25/2016

0 Comments

 
When you first begin vermicomposting (with a pound of worms), it may seem as though the worms will never eat the food waste you produce. Then, as the worms multiply, you develop a nice balance and the worms keep pace with your input.When you have as many worms as I do (18 bins with 4-15 pounds), my family of cannot produce enough to keep them all fed and multiplying. So, I utilize the waste from my local organic grocer (Lois’ Natural Marketplace in Scarborough). Mary and Chris (the chefs at Lois’ deli) kindly set aside coffee grounds and food scraps when I request it.

I am writing about this not to tell you how to feed a few hundred pounds of worms, but to encourage a grass roots movement. Think of this as an alternative recycling opportunity where everyone wins.
  • Everyone wins because:
  • My worms benefit from having nice organic veggies,
  • I benefit because I have a free supply of food and I can trust them to put only worm food in the bags,
  • Lois’ benefits from having less food waste in their dumpster, and
  • In the larger scheme of things, society benefits.

That’s right, society benefits. By having less waste go to the dump (or in this case the trash-to-steam incinerator), society benefits because less food waste equals less weight equals less fuel used to truck it around. Also, I learned from Chris of EcoMaine (the company who runs the incinerator) that organics such as food waste are a poor source of energy in the trash-to-steam process. They would rather not collect food waste.


I know I haven’t made a big difference but my little contribution fits the “think globally, act locally” concept.


In the course of a year, I probably keep a thousand pounds of food and yard waste out of the waste stream (both from my home and collections from Lois’). Scale that up a few-fold, and by outdoor composting in the summer and vermicomposting in the winter, we can all make a difference.


​This makes me think: can we all reach out to grocers or restaurants in our community to see if they would be willing to set aside food waste for pickup during the spring, summer, and autumn for addition to our outdoor compost piles? Can we bring a 5-gallon bucket with us when we shop to pick up some waste veggies? Can we encourage our fellow gardeners, others in community gardens or garden clubs to do the same?


Originally published on March 1, 2009
​
0 Comments

Trial and Error

8/25/2016

0 Comments

 
I've posted new worm bin instructions.

I have posted new instructions for making a worm bin. Earlier this year, I had an accident when drilling in the side of bins, and I am now recommending you make holes in the top of your bins.

I was drilling holes in the side and the drill slipped off the plastic and hit me in the leg. Fortunately, I was wearing pants and I didn't hurt myself.

This scared me and made me think. Why drill holes in the sides?

The worms don't care where the holes are, and the sides are sloped and flex when you try to drill the holes (both of which make it harder than it needs to be).

Holes in the nice flat top would be so much easier. So I tried it and viola! Works just as well and it is much easier.

My revised worm bin instructions are on the Your Bin page.

Cheers,
Mark

Originally published on November 21, 2008
0 Comments

Vermicomposting is EASY!

8/25/2016

0 Comments

 
Getting started is a simple process:

The key to getting started and keeping your worm bin trouble free is to follow four simple rules:

1. always bury the food under the worms and the bedding,

2. only feed in corners (alternating every week),

3. keep at least 3 inches of shredded newspaper on top (the newspaper should not be wet, moist like a wrung our sponge is OK. If it is dry, that is OK) and

4. don't over feed them.


Rule 1: burying food prevents fruit flies from finding the food in your bin.

Rule 2: feeding in corners prevents overfeeding because you can observe how much food is left from previous feedings. Corner feeding also allows worms to flee if something is wrong with the food (pH, temperature, etc.).

Rule 3: a nice think layer of bedding keeps your bin from getting too wet and also helps prevent fruit flies.

Rule 4: overfeeding is a source of problems (moisture, smell, fruit flies, etc.). Feeding too little is preferable to feeding too much. Start slowly and ramp up over time.

If you have not already started, I would encourage you to download instructions to build your own bin and get started now.

It is not too late to begin.

Cheers,
Mark

Originally published on November 19, 2008
0 Comments

Bedding for worm bins and the zen of shredding newspaper

8/23/2016

0 Comments

 
Shredding newspaper has become my second hobby (next to vermicomposting). To provide bedding for my herd, I shred a lot of newspaper.

I like newspaper because it is free and plentiful. The papers come to my home and yesterday's paper is always available.

Office paper works equally well (for an office bin, your shredded office paper would work great). You want long strips, so a standard shredder works (but not a cross-cut shredder). Long, thin strips are better because cross-cut paper tends to mat when wet and you want your bedding to be airy.

Most non-glossy printed material can also be used since most high-quality laser toner and ink-jet inks are non-toxic. If you are going to use a lot of lot of a single source in your worm bin, check with the manufacturer to be certain. The Portland Press Herald uses non-toxic ink.

There is a technique to shred newsprint. I prefer to hold it by the folded edge (1-2 sections at a time) and shred into 1/8-1/4 inch strips. It shreds really easily and it makes a nice swooshing sound. For a long time Bert thought I was sweeping every morning!

Another advantage of newspaper is that shredding it is relaxing. It sounds strange, but I shred A LOT of newspaper, and I have come to enjoy this quotidian task. It is a morning activity I appreciate after I feed my herd. I shred yesterday's paper in the cellar and listen to NPR while I sip my coffee. It is a few minutes of meditation before I start my day.

Happy shredding!
Mark

Originally published on September 27, 2008

0 Comments

    Mark Follansbee

    Vermicomposting and beyond! Check out what I've been up to on my blog.

    Please note that I'm migrating my blog from its original site. I'll be reposting previous entries until the move is complete. Click here to visit the full Blog Archive.


    Archives

    February 2023
    September 2021
    January 2021
    February 2019
    September 2018
    August 2018
    July 2018
    March 2018
    December 2017
    May 2017
    November 2016
    October 2016
    September 2016
    August 2016
    July 2016


    Categories

    All
    Bacteria
    Barter
    Bee Boxes
    Bugs
    Composting
    Compost Tea
    Energy
    Feeding
    Frugal
    Garden
    Gifts
    Heating
    Insects
    Large Scale
    Lawn Care
    Manure
    Native Plants
    Pet Waste
    Recycle
    Red Wigglers
    Soil
    Solar
    Vermicomposting
    Windrows
    Worm Bins
    Worm Castings
    Worm Composting


    RSS Feed

    View my profile on LinkedIn
Powered by Create your own unique website with customizable templates.